
Pilates with resistance bands is one of my favourite ways to mix up classic Pilates routines and seriously take the challenge up a notch. These stretchy, lightweight bands pack a punch for toning, flexibility, and fullbody strength. If you find regular mat Pilates too easy or just want more variety, resistance bands are a super useful tool worth checking out.
Pilates itself focuses on controlled movement, body alignment, and core strength; resistance bands take all of that up a notch by adding gentle but constant resistance to every move. I find it perfect for anyone short on time, looking for a portable workout, or wanting extra options without cluttering their home with heavy gym gear. This guide breaks down everything you need to know about starting Pilates with resistance bands, from beginner basics to choosing the right bands, following along with tutorials, and troubleshooting some common challenges.
Getting Started: What You Need for Pilates With Resistance Bands
Getting set up is pretty straightforward. Besides a basic Pilates or yoga mat, you just need a set of resistance bands. There are a few different kinds out there, but for Pilates, I’ve found these are the most popular options:
- Flat, non-loop bands: These bands are long, stretchy, and great for wrapping around arms, legs, or feet during moves like leg circles or arm extensions.
- Loop bands: These form a closed circle and are mostly used for moves that need you to keep tension around your thighs or ankles, such as bridges or clamshells.
- Handles or no handles: Some bands come with padded handles, which make them easier to grip for arm exercises, while flat bands can be knotted or held directly for more versatility.
It’s worth picking up a set with at least two to three different resistance levels (light, medium, heavy). This way, you can adjust the difficulty as you get stronger or swap between moves targeting different muscle groups. If you’re starting out, try to grab a band made by a trusted brand, so you know you’re getting something that won’t snap or feel flimsy halfway through a move.
Tips for Choosing Quality Bands
- Look for bands that feel sturdy and spring back to shape (no sagging or overly sticky surfaces).
- Opt for latexfree if you have allergies or sensitive skin.
- Brands like TheraBand, SPRI, and Fit Simplify are popular and have decent reviews.
- Don’t forget to check the packaging for weight or resistance ratings. Sometimes they use colour codes—keep a chart handy or make a note on your phone so you remember which band gives you which level of difficulty.
Before you jump into routines, check your bands for any tears or weak spots to avoid accidents. Nobody likes a snapped band mid workout!
Core Benefits of Pilates With Resistance Bands
Adding resistance bands to your Pilates routine isn’t just about making things harder. I’ve noticed all sorts of extra perks, especially for folks who want more dynamic training without leaving home. Some of the biggest pluses include:
- More targeted muscle activation: Bands help you tap deeper into your glutes, core, shoulders, and upper back, so you really feel the burn in new places.
- Improved flexibility: You get extra support for stretching moves, which makes it easier to safely push a little further. I love how I can use a band to stretch my hamstrings more comfortably or to help with difficult arm stretches.
- Low impact strengthening: Perfect if you have sensitive joints, since bands add resistance without strain or heavy weights. This is great for anyone recovering from an injury or just looking to ease into fitness at their own pace.
- Portability: Bands take up almost no space, so you can do a full Pilates workout anywhere—at home, in a park, or while traveling.
- Budget friendliness: Resistance bands are much more affordable than most exercise equipment. You can add plenty of difficulty and variety to your routines with just a few bands, instead of investing in large machines.
Research shows resistance training helps maintain muscle and bone health as you age (see this study). So if you’re bored with basic moves or looking for a safe challenge, bands are a practical upgrade. Plus, they’re super easy to add in even if you only have a few minutes for a quick session.
BeginnerFriendly Pilates Resistance Band Exercises
New to using bands? Start with a handful of tried and true exercises I see recommended everywhere, and that I’ve found super helpful myself.
1. Band Assisted Roll Up

- Hold both ends of a flat band, looped around your feet. Start lying flat, and as you slowly roll up, the band both supports you and adds extra resistance for your core muscles.
If you struggle to roll up all the way, the band will give just enough assistance to help. Over time, you’ll build the strength to do the move band free, too.
2. Clamshells With Loop Band
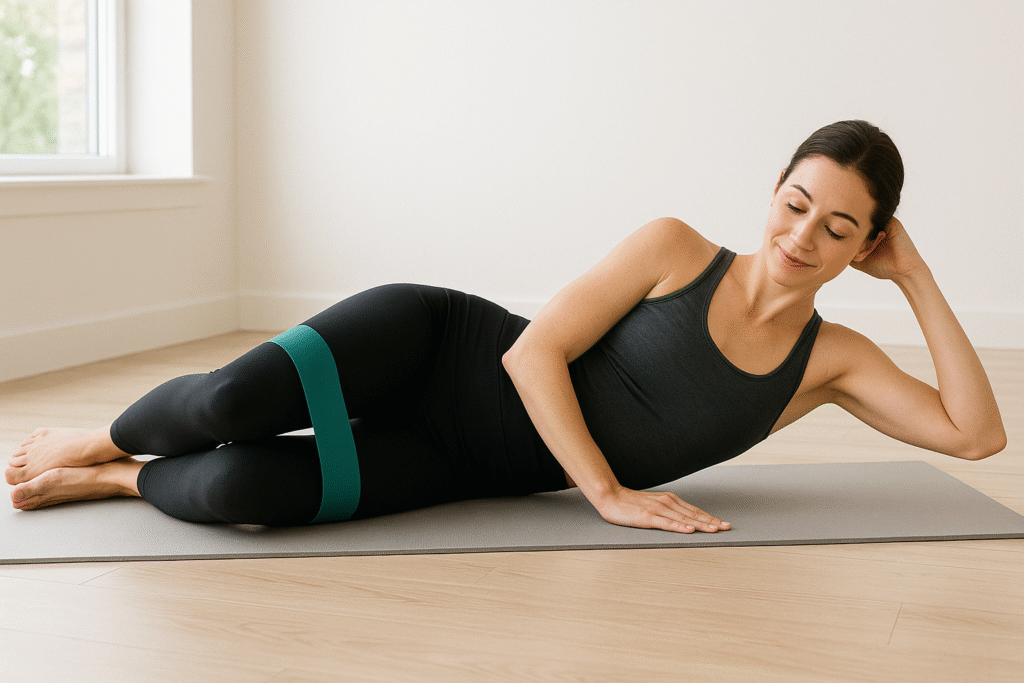
- Place the loop band just above your knees. Lie on your side, knees bent at 90 degrees. Open and close your top knee, keeping your feet together to really fire up the glutes and outer thighs.
Try holding the top position for a second or two to really feel the muscle engagement. It’s one of the best moves for waking up the glute medius!
3. Band Chest Opener

- Hold a flat band in both hands behind your back and gently pull to open your chest. This move stretches your shoulders and works your upper back at the same time, perfect for anyone who sits at a computer all day.
4. Band Leg Circles

- Wrap a flat band around one foot, hold both ends in your hands as you lie on your back, and make slow, controlled circles in the air. The band adds core challenge and improves hip flexibility.
Try two sets of 1015 reps for each move, focusing on slow, intentional movement and steady breathing. Remember, it’s about quality, not speed.
5. Banded Squats

- Stand on a flat band and hold the ends at your shoulders. Lower yourself into a squat, keeping tension on the band as you rise. This variation adds intensity and is especially good for leg strength.
How to Follow Pilates With Resistance Bands Tutorials
There are plenty of ways to learn Pilates resistance band routines, even as a complete newbie. Here’s how I get the most out of online tutorials and classes:
- Start with short, focused videos: A lot of YouTube instructors offer 10 to 20minute Pilates band routines, which are great for learning a few moves at a time. Look for channels like MOVE WITH NICOLE, Lottie Murphy, or Pilates Anytime, which regularly upload varied tutorials. Some tutorials also include beginner and advanced options to keep things interesting.
- Read clear written guides: Plenty of websites and apps (like Blogilates, Verywell Fit, and DoYou) offer photo step by steps for band workouts, so you can review form cues at your own pace. Written guides make it easy to pause and check your alignment anytime.
- Sign up for live or Zoom classes: Many Pilates studios now offer virtual band classes. If you want instant feedback on your form, this can be worth the investment. Instructors often give specialised tips that make a big difference, especially when using equipment.
What to Watch For During Tutorials
- Good instructors clearly demonstrate how to anchor the band safely and cue proper alignment for moves (head, neck, and pelvis especially). Watch for their tips on keeping shoulders relaxed and core engaged.
- It’s really important to check you’re feeling the moves in the right places—mostly core, glutes, shoulders, or thighs, and never sharp pain in joints or the lower back. If something feels off, pause and adjust.
- Don’t be shy about rewinding a video or asking for clarification. Form is so important, especially when new resistance is in play.
Tips for Building Your Resistance Band Pilates Routine
I like to keep it simple by following a rough template; this helps you avoid decision fatigue and gives you a plan to build on:
- Warm up: Spend two to three minutes with gentle seated twists, cat cows, or toe touches.
- Main set: Pick four or five Pilates moves that hit different areas—think core, glutes, upper body, and legs. Do two sets each, 10/15 reps, resting as needed.
- Cool down: Use the band for hamstring or shoulder stretches to loosen up and prevent soreness.
Switch out the exercises every week or two to keep things fresh and challenge new muscles. If you have a hard time sticking to a schedule, invite a friend to join you or set reminders, so you stay consistent. Tracking your progress in a simple journal can also help keep you motivated.
Experiment with rep ranges, resistance levels, and even the types of bands. Your routine will naturally grow and change as you gain strength and flexibility, so don’t be afraid to mix in new challenges.
Common Questions & Troubleshooting
How do I know what resistance level to use?
I usually start with the lightest band and increase resistance as I feel moves getting easier. For leg and glute work, medium or heavy bands give a great challenge, but for arms and shoulders, light resistance is usually plenty. Pay attention to your body—if you can’t control the move, drop to a lighter band.
Are resistance bands safe for beginners?
Yes, if you move slowly, anchor bands securely, and listen to your body. Avoid overstretching the band or locking your joints. If you’re new to Pilates in general, it might help to do a few basic mat sessions first before adding bands.
What if bands keep slipping or rolling up?
- Smooth out your leggings or wear shorts for better grip.
- Keep the band flat (not twisted) against your skin or clothes.
- If it’s still an issue, try tying a flat band in a loop for more stability. Practice a few moves slowly to make sure your setup works for you.
Do I need anything else?
A mat with a bit of cushion helps. For some moves (like bridges), a small pillow under your head is comfortable. No need for fancy extras to get a great workout, but a water bottle and hand towel are good add-ons, just in case your hands get sweaty.
Can resistance band Pilates help with weight loss?
While Pilates isn’t focused solely on burning calories, the extra resistance will make your body work a little harder. Adding bands can definitely add intensity, increase your muscle tone, and support a healthy metabolism. For best results, combine resistance band Pilates with a balanced diet and some regular cardio activity—whether that’s brisk walking, cycling, or another fun activity you enjoy. The key is to move regularly and make it enjoyable enough that you stick with it over time.
Next Steps: Getting Started With Pilates Resistance Bands
Adding resistance bands to your Pilates routine brings fresh energy, challenge, and fun into your workouts, whether you’ve been doing Pilates for years or are just starting out. The important thing is sticking with a routine that suits your schedule, body, and goals. Even 10/15 minutes makes a difference, and you’ll feel stronger, more flexible, and more energised pretty quickly.
Your Action Plan:
- Choose a set of resistance bands with at least two different strengths. Consider buying a set that also includes a carry bag for easy storage.
- Pick three to five exercises to learn, using short video tutorials or a step by step guide. Make notes on your form and keep track of which bands you like best for each move.
- Set aside a couple of mornings or evenings each week to practice. Mix in some relaxing music or light stretching to create a routine you look forward to.
Ready to try it? Grab a band, clear some space, and get moving. It’s a small step that might totally change up your Pilates game. If you stick with it for a few weeks, you’ll likely see steady progress in your strength, posture, and overall energy. And who knows—you might even inspire someone else to grab a band and join the adventure, too!
Elena,
Your article’s central message introduces and guides readers through the benefits, setup, and execution of Pilates with resistance bands. It really is a go to starting point that is well-organized and informative, covering everything from equipment selection and beginner-friendly exercises to troubleshooting tips and common questions. The content is especially beneficial for fitness enthusiasts looking to enhance their home workouts, beginners including older individuals seeking low-impact strength training, or anyone needing a portable, affordable, and effective exercise option. I’ve been using resistance bands for full body toning and love the fact they’re less expensive than gym hardware and I can take them with me on vacation. You’ve made Pilates more accessible and engaging, particularly for those seeking variety, improved flexibility, or increased muscle activation without the need for bulky equipment. My only comment would be to include exercise illustrations so that someone like myself that is not familiar with the Pilates terminology can follow along and just start.
Thank you so much, Drew, for your thoughtful and encouraging feedback! I’m so glad the post was helpful—and yes, resistance bands are the best, right? I love how easy they are to travel with and how much you can do with just a few of them. Really appreciate your note about adding exercise illustrations too—that’s such a great idea, especially for anyone new to Pilates. I’ll definitely look into adding those to make things even more beginner-friendly. Thanks again for reading and sharing your thoughts!